Managing “Real World” Character Limits in Salesforce with a Light Hand

I recently had a client come to me with an interesting use case. Their organization makes low-interest impact loans to entrepreneurs from a fund in which other constituents who care about their mission make investments. It’s called a CDFI, or Community Development Financial Institution, and it’s an amazing way to bring the power of the market to communities that traditionally get left behind.
Because they manage investments and loans, they’re often creating documents outside of Salesforce, especially checks, that have character limits once printed. In this case, their check printing service cuts off lines after 37 characters.
Obviously, in their configuration we’re using the standard address fields on Accounts and Contacts. The client did not want to character limit these fields – and anyway, that would be tough with NPSP address fields… for a whole bunch of reasons. I hated the idea of creating a whole duplicate set of fields (recall Rule #1 of database design: Thou shalt not track the same data point in two places), and anyway the client assured me this wasn’t a huge number of records. They just needed a visual cue to check that all was well before they sent the disbursement request to Finance and got back a nonsensical check.
I asked them how they managed this currently, and out came the illicit spreadsheet. I love this part of the project – you know you’re really getting somewhere when the spreadsheets come out! On this spreadsheet, the client had two simple rows:
Bank Name: Anytown USA Credit Union
Characters: abcdefghijklmopqrstuvwxyz1234567890
The character row existed for no other reason than to give them a visual cue as to how much space they had left for the check printing! So I knew a visual-based tool would be the way to go here.
I turned to Flow for this solution, as I so often do. I built a screen flow with just two components, specifically a “Get” for the parent custom record, and then what I called the “Detail Screen,” or the place where I plan to show the truncated details.
Most of the heavy lifting here was managed by formula fields. For this use case, checks are either sent directly to the Contact in question, or to their bank, so there’s a bit of conditional logic, but what the formula fields really allowed me to do was manage the content.
I wanted to create an end result that showed the correct information with asterisks masking the “empty spaces” up to 36 characters. So, for each field, I created a formula variable that counted the number of characters in the section of text, and then a second formula variable that built the final result.
Now, I could have put the logic counting the characters directly into my final formula field, but sometimes I struggle with formula troubleshooting. I find breaking down the logic into manageable pieces makes it easier to find where you are missing parentheses or commas. There’s nothing worse than staring at a formula for an hour trying to find where I made a typo!
So, let’s look at the Bank Name. Here are our two formula variables:
fBankName
fBankNameCount
Again, my week little brain struggles with building massive formulas all at once, so I started with fBankName, and created a text formula that simply pulled the Name from the correct account via the lookup on my custom object:
{!Get_Note.Remittance_Bank__r.Name}
Easy Peasy! I can of course character limit this by adding:
LEFT( {!Get_Note.Remittance_Bank__r.Name} , 36)
This ensures that if the bank’s name is too long, it will be truncated at the appropriate number of characters, cueing the user that they need to update the name to make check processing run smoothly.
Now I just have to figure out how to create some sort of mask to fill in the open spaces. To do this I needed a variable that told me how many characters this long the text string was, so I could add the correct number of masking characters at the end of this text string. Again, I could have done this directly in the formula field but I decided to make life easier for myself and just create another formula variable. Enter fBankNameCount:
LEN({!Get_Note.Remittance_Bank__r.Name})
Armed with this number, I went back to the original fBankName variable, beefing it out like so:
LEFT( {!Get_Note.Remittance_Bank__r.Name}, 36)
&
LEFT ( “************************************”, ( 36 – {!fBankNameCount}) )
The first line is just my bank name, limited to 36 characters, same as before. To this I added up to 36 asterisks, which I also character limited using the LEFT() function. To make sure the two always add up to no more than 36 characters, I used a calculation in the argument following the “***”’s, which indicates the number of characters to include before cutting off. In this case, I said cut this off at 36 characters minus however many characters my original string is. If the original string for the bank name is MORE than 36 characters, then no asterisks are added. If it’s any number LESS than 36, then the difference is made up by “***”.
In one final touch, I renamed the “Finish” quick action button to “Refresh,” since if you put a screen flow on a page layout that doesn’t do anything else, that’s all that button will do anyways!
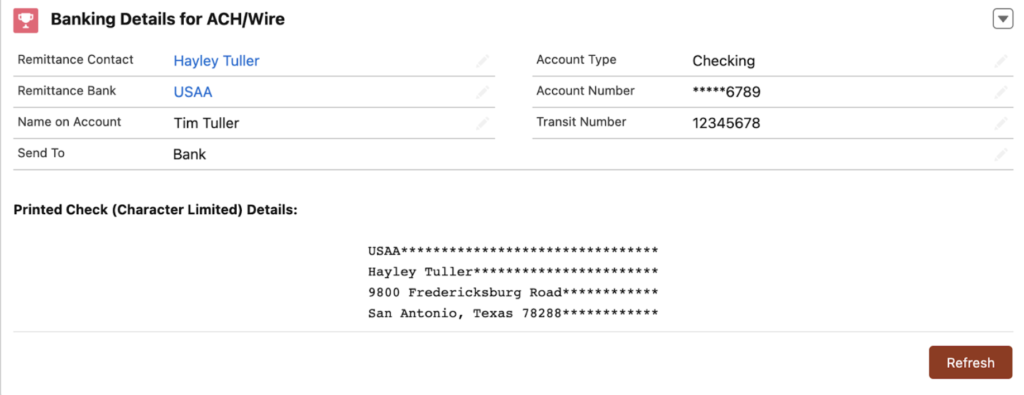
This is the end result, and I’m pretty happy with it!
Tucked behind a tab on the original custom object lightning page layout, paired with a Related Record component making it easy to update the key fields, the flow and the formulas give the user a quick and easy to read representation of how this text will look printed out on a check. Job done with just a few formulas and a single screen flow.
Have you ever created a flow solution just to show text? Let us know about it in the comments!